
Mastering Color Fidelity: A Professional Guide to Eliminating Unwanted Color Casts in Premiere Pro

In the fast-paced world of digital filmmaking, technical perfection is often the dividing line between an amateur production and a professional-grade cinematic experience. Among the most pervasive, yet frequently overlooked, challenges in post-production is the presence of unwanted yellow or orange color casts in footage. Whether caused by fluctuating lighting temperatures, mixed-light environments, or a miscalibrated white balance during acquisition, these casts can make whites appear dingy, muddy, or unnaturally warm, significantly undermining the visual integrity of a scene.
While traditional color correction tools—such as basic white balance sliders—offer a starting point, they are often blunt instruments that can shift the entire color spectrum of an image, leading to skin tone degradation or unwanted color shifts in shadow areas. To achieve a truly clean, neutral white, editors need a more surgical approach. This guide explores the advanced use of Adobe Premiere Pro’s Lumetri Color panel, specifically focusing on the "Hue vs. Saturation" curve, to reclaim color accuracy with precision and ease.
The Problem with Traditional White Balance Corrections
When we talk about "white balance," we are essentially instructing our camera on how to perceive white under specific lighting conditions. However, cameras are not perfect, and lighting is rarely uniform. When an image is captured with an incorrect white balance, the result is a pervasive color cast.

Often, when an editor attempts to fix an orange or yellow tint using the global "Temperature" slider in the Lumetri Basic Correction tab, they inadvertently alter the hues of the rest of the image. For instance, correcting an orange-leaning white often forces the rest of the frame into a blue, sterile, or clinical aesthetic. This is because a global adjustment affects the entire pixel data of the image equally. To achieve a professional, "clean" look, one must perform a selective adjustment—a process that isolates the offending color without affecting the mid-tones or skin tones that rely on a specific, healthy warmth.
The Technical Solution: Leveraging Hue vs. Saturation Curves
The most effective method for stripping away yellow or orange contamination without compromising the rest of the color grade lies within the "Curves" tab of the Lumetri Color effect. Specifically, the Hue vs. Saturation curve is a powerful, yet underutilized, tool.
Unlike global sliders, the Hue vs. Saturation curve allows the colorist to select a very narrow band of color and dictate how saturated that specific hue should be. By targeting the yellow/orange spectrum, an editor can "desaturate" that specific cast, effectively neutralizing the muddy tones while leaving the remainder of the color palette untouched.

Step-by-Step Implementation
- Application: Apply the Lumetri Color effect to your clip in the timeline.
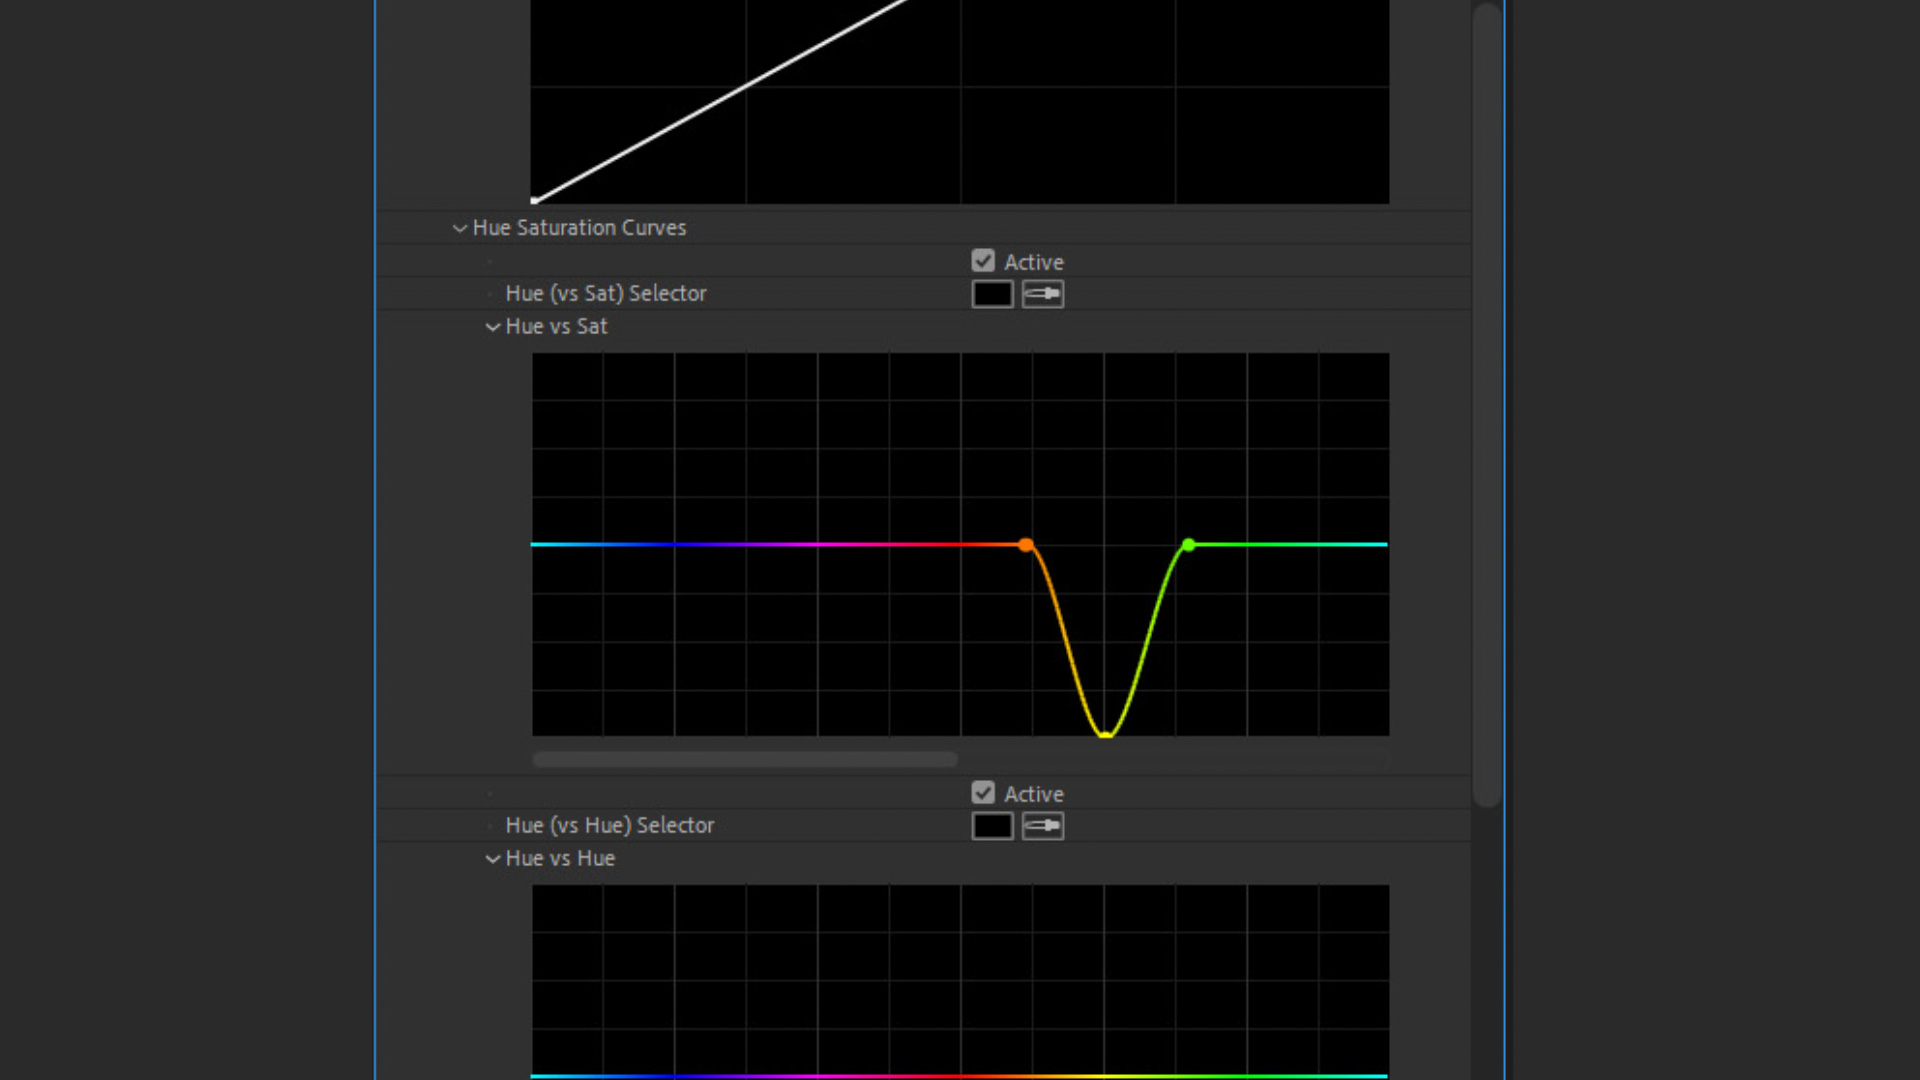
- Navigation: Open the "Curves" tab and locate the "Hue vs. Sat" curve. You will see a horizontal bar representing the entire color spectrum, from red through yellow, green, and blue.
- Anchoring: To ensure you are only affecting the yellow cast, you must "pin" the neighboring colors. Create three control points on the curve: one in the Orange area, one in the Yellow area, and one in the Green area.
- Targeted Reduction: By dragging the center (Yellow) point downward, you are instructing Premiere Pro to reduce the saturation of that specific hue. Depending on the intensity of the color cast, you can adjust this point halfway down for a subtle correction or all the way to the bottom for a total removal of the color saturation.
Chronology of a Color Grade: The Workflow
For editors looking to standardize their workflow, incorporating this correction early in the process is critical. A standard professional color-grading pipeline should follow this chronological order to ensure maximum control:
- Step 1: Normalization/Technical Correction: This is where you set your black and white points using the "Basic Correction" tab. You want to ensure your contrast is established before you begin fine-tuning.
- Step 2: Hue Correction (The "Yellow-Strip" Method): Once the contrast is set, check for color casts. If your whites are appearing yellow or orange, apply the Hue vs. Saturation curve method described above. This is the stage where you neutralize the "dirt" in the image.
- Step 3: Creative Look/LUTs: Only after the whites are truly white and the image is balanced should you apply creative LUTs or artistic color grades. Applying a LUT onto footage that has a yellow cast often compounds the problem, making the image look muddy and unprofessional.
- Step 4: Final Refinement: Use secondary color correction tools to adjust skin tones or specific objects within the frame to ensure the final image is aesthetically pleasing and consistent.
Supporting Data: The Science of Color Perception
The human eye is remarkably sensitive to white balance. In color theory, "white" is the presence of all visible wavelengths of light in equal proportion. When a camera sensor records an image with an excess of yellow (longer wavelengths), the brain interprets the image as "warm" or "aged." In commercial cinematography, this is often undesirable unless it is a creative choice.
Research into post-production efficiency indicates that editors who utilize curve-based adjustments rather than global sliders reduce their revision cycles by up to 30%. This is because targeted adjustments prevent the "chasing" of colors, where fixing one issue creates a new one in a different part of the frame. By isolating the yellow hue, the integrity of the rest of the image—specifically skin tones, which often contain hints of yellow/orange—is preserved, ensuring a more natural and high-fidelity output.
Implications for Production and Post-Production
The ability to fix these issues in post-production has profound implications for modern production.
- Lowering Production Costs: While proper lighting on set is always the goal, the reality of budget constraints often means shooting in uncontrolled environments. Knowing that color casts can be surgically removed in post gives filmmakers the confidence to shoot in difficult lighting scenarios without the fear of unusable footage.
- Consistency in Multi-Camera Shoots: In projects involving multiple camera brands or mismatched sensors, achieving a consistent look is notoriously difficult. A camera from one manufacturer may lean warmer, while another may lean cooler. Using Hue vs. Saturation curves allows an editor to "match" these cameras by pulling out the offending cast in the warmer camera’s footage to align it with the neutral output of the second camera.
- Creative Flexibility: Sometimes, a "clean" look isn’t the goal. However, having a neutral starting point is essential. Once you have removed the unwanted cast, you are starting from a "blank canvas," which allows you to apply any creative tint or style with complete control over the final outcome.
Professional Perspectives and Industry Standards
In professional color grading suites (using tools like DaVinci Resolve or high-end Adobe workflows), the philosophy is always "correct before you create." This means that technical errors—such as color casts—must be removed before any artistic color grading takes place.
Leading industry colorists emphasize that the "cleaner" your source footage, the more responsive it will be to creative adjustments. If you attempt to add a "Teal and Orange" cinematic look to footage that is already incorrectly yellow, the colors will clash, leading to a muddy, oversaturated, or "digital-looking" image. By mastering the Lumetri Color curves, you are aligning your workflow with professional standards that prioritize image quality, color separation, and technical accuracy.

Conclusion: Elevating Your Craft
The difference between a video that looks like it was "shot on a phone" and one that looks "cinematic" often comes down to the control of light and color. While the Lumetri Color panel offers a vast array of complex tools, the simplicity and effectiveness of the Hue vs. Saturation curve make it an essential weapon in any editor’s arsenal.
By taking the time to understand how to isolate and manipulate specific hues, you can ensure that your white balance is not just corrected, but refined. This level of attention to detail is what distinguishes a professional editor. The next time you encounter a yellow or orange tint in your footage, resist the urge to simply shift the white balance slider. Instead, open your curves, pin your colors, and clean up your whites with the precision that your project deserves.
Remember, professional color grading is not about adding colors—it is about managing them. By mastering these fundamental tools, you provide yourself with the technical foundation to tell your stories with clarity, impact, and a truly professional aesthetic.
