
Mastering Audio in Adobe After Effects: A Comprehensive Guide for Motion Designers
While Adobe After Effects is primarily celebrated as the industry-standard powerhouse for motion graphics and visual effects, it is rarely the first port of call for audio engineering. However, for the motion designer, sound is the heartbeat of a compelling visual story. Whether you are synchronizing kinetic typography to a pulsing beat or adding foley effects to a complex 3D animation, a foundational understanding of After Effects’ audio capabilities is essential.
This guide explores the ecosystem of sound within After Effects, providing a professional roadmap for managing, editing, and manipulating audio assets to elevate your visual projects.
Main Facts: The Intersection of Sound and Motion
The core challenge of working with audio in After Effects stems from its design architecture. After Effects is a non-linear compositor, not a Digital Audio Workstation (DAW). Consequently, audio processing is secondary to frame-by-frame rendering.
The most critical fact for any user is that audio playback in After Effects is prone to latency. When scrubbing through a timeline or using standard playback, the audio signal may not align perfectly with the visual frame due to the software’s priority on buffering video data. Therefore, the professional workflow mandates a reliance on visual cues—specifically waveforms—rather than auditory feedback for precision-based animation.

Key takeaways include:
- The Audio Panel is your primary window for monitoring output levels.
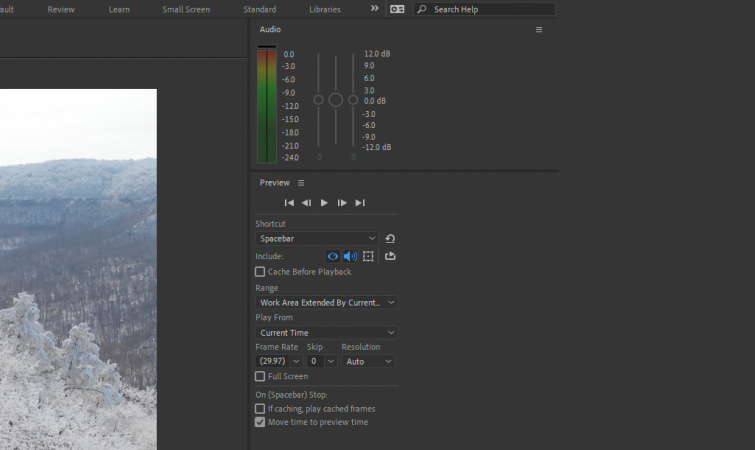
- The Preview Panel acts as the command center for playback settings.
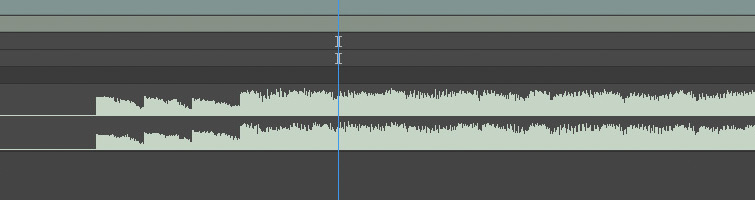
- Waveform Visualization is the industry standard for beat-syncing and editing.
- Convert Audio to Keyframes is a powerful automation tool that bridges the gap between sound frequencies and visual properties.
Chronology: A Workflow for Audio Integration
To integrate audio effectively, follow this established chronological workflow to ensure efficiency and precision.
1. The Setup: Audio and Preview Panels
Before you drag a single asset onto the timeline, ensure your workspace is optimized. Navigate to Window > Audio to open the Audio panel. This provides a real-time visual representation of your sound levels. It is essential for monitoring peak levels and preventing digital clipping. Simultaneously, open the Preview panel (Window > Preview) to configure your playback parameters. This is where you toggle audio on or off and define how the application handles memory during playback.
2. The Import and Visualization
Once your audio is imported into the Project panel, drag it into your composition. To begin the editing process, select the layer and tap the "L" key twice in rapid succession. This action reveals the waveform. For professional-grade editing, you should never rely on your ears alone; the waveform displays the precise amplitude peaks, which act as visual markers for your keyframes.
3. Execution: Layer Manipulation and Keyframing
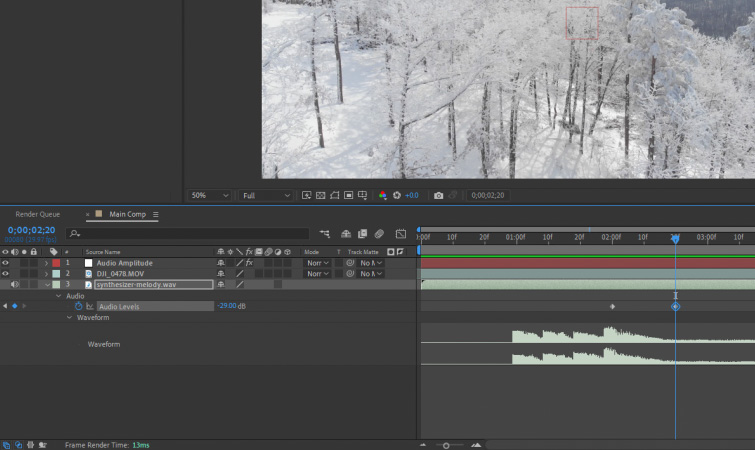
After identifying your beats on the waveform, manipulate the audio levels directly within the layer properties. By toggling down the layer settings, you gain access to the Audio Levels property. By enabling the stopwatch icon, you can set keyframes to create custom fades or dips, allowing you to duck music under dialogue or build tension with a gradual volume increase.
Supporting Data: Navigating the Technical Toolkit
Efficiency in After Effects is defined by how well you utilize keyboard shortcuts. Because the software is complex, mastering the "hotkeys" for audio is the fastest way to accelerate your production speed.
The Essential Shortcut Cheat Sheet
- Spacebar: Executes a standard preview. Ensure audio is enabled in the Preview panel for this to function.
- Numpad 0: Triggers the RAM Preview. This is the most accurate method for reviewing your work, as it forces the system to cache both audio and video, significantly reducing latency issues.
- Numpad . (Decimal): Triggers an "Audio Only" preview. This is a vital diagnostic tool when you need to focus solely on the timing and rhythm of your soundtrack without the visual distraction of the composition.
Technical Limitations
It is important to note that while After Effects includes built-in audio effects—such as Bass & Treble, Reverb, and Stereo Mixer—these are intended for minor adjustments. They are not replacements for professional tools like Adobe Audition or iZotope RX. If your audio file requires noise reduction, compression, or complex equalization, perform these tasks in a dedicated DAW before importing the final file into After Effects.
Official Responses and Best Practices
Industry professionals often debate the necessity of audio editing within a motion graphics environment. The consensus from expert motion designers and Adobe documentation suggests a "Split-Workflow" approach.
The "Convert Audio to Keyframes" Power Move
One of the most robust features in After Effects is the ability to turn sound data into motion data. By right-clicking an audio file in the composition and selecting Keyframe Assistant > Convert Audio to Keyframes, After Effects generates a "Null Object" layer named Audio Amplitude.
This layer contains three sliders representing the Left, Right, and Both channels. By using a simple expression (pick-whipping a property to these sliders), you can link the scale, opacity, or position of a layer to the bass or treble of the track. This creates a reactive animation that feels organic and deeply integrated with the music.
Professional Advice on Latency
"Never trust the sync while scrubbing," says a common refrain among veteran compositors. Because After Effects must calculate the video frame before outputting the sound, the delay can be disorienting. Always use the Graph Editor to verify your keyframes against the visual peaks of the waveform. If you are animating to a beat, placing your keyframes at the exact start of the wave spike ensures that your motion hits the listener’s ear exactly when the visual changes.
Implications: The Future of Audio-Visual Synchronicity
The ability to manipulate sound within the motion graphics environment has profound implications for digital marketing and content creation. As the demand for short-form video increases—particularly for platforms like TikTok, Instagram Reels, and YouTube Shorts—the need for high-speed, high-impact audio-visual synchronization has never been greater.
The Role of High-Quality Assets
Even the best software cannot compensate for poor source material. Using royalty-free, professionally mastered tracks and high-quality sound effects is the final pillar of a successful project. Incorporating sound design—the subtle addition of "whooshes," "hits," and "textures"—adds a layer of professional polish that distinguishes amateur motion graphics from high-end production.
Final Thoughts on Workflow Integration
While you should always strive to finalize your audio mixing in a dedicated environment, the ability to make micro-adjustments within After Effects is a superpower for the solo creator. By mastering the waveform, utilizing the Audio Amplitude nulls, and adhering to the RAM Preview workflow, you can ensure that your projects are not just seen, but felt.
Whether you are crafting a high-octane trailer or a minimalist corporate animation, remember that audio is 50% of the experience. Treat your audio layers with the same respect as your visual layers, and your work will inevitably resonate with your audience on a much deeper level.
For those looking to expand their sound library, numerous resources now offer "Epic Sound Effects" specifically curated for video trailers. These libraries are invaluable for providing the cinematic impact required in today’s competitive digital landscape. Always ensure you are licensing your assets correctly to maintain professional standards in your creative output.
