
Mastering Color Precision: How to Eliminate Unwanted Yellow Tints in Post-Production

In the meticulous world of video editing, the pursuit of the perfect image is often hindered by the subtle, persistent plague of inconsistent color casts. Among the most frequent culprits is the dreaded yellow or orange tint that can unexpectedly manifest in white surfaces—turning a pristine, neutral scene into something that feels muddy, dated, or unprofessional. Whether caused by an improper white balance during acquisition or the complex interplay of ambient light temperatures, these color casts can be notoriously difficult to neutralize without compromising the integrity of the rest of the footage.
This guide provides a professional-grade technical workflow for isolating and eliminating these distracting hues using Adobe Premiere Pro’s Lumetri Color panel. By moving beyond basic temperature sliders and utilizing the surgical precision of the Hue vs. Saturation curves, editors can achieve clean, neutral whites that maintain the natural skin tones and overall color depth of their projects.
The Core Challenge: Understanding Color Casts in Digital Video
When capturing footage, the goal is to record a faithful representation of the subject. However, digital sensors are sensitive to the color temperature of the ambient light—measured in Kelvin. If a camera is not perfectly calibrated for its environment, or if the scene features mixed lighting (such as daylight streaming through a window hitting a tungsten-lit interior), the "white point" of the image shifts.

Whites, which should be neutral (a perfect balance of red, green, and blue light), begin to absorb the dominant color temperature of the environment. A yellow or orange cast—frequently referred to as a "warm" tint—often results from light sources like incandescent bulbs or the golden hour of sunrise. While sometimes aesthetically pleasing, an unintended cast makes whites look dingy or "dirty." Attempting to correct this using global White Balance or Temperature sliders often fails because it impacts the entire image, resulting in skin tones that become unnaturally cool or magenta-shifted.
A Chronological Approach to Color Correction
To effectively mitigate these issues, editors must adopt a non-destructive, layered workflow. The following steps outline the most efficient method for restoring neutrality to your footage.
Step 1: Initial Assessment and Setup
Before applying any effects, perform a "scopology" check. Use the Lumetri Scopes (specifically the Vectorscope and Parade) to confirm the color bias. If the RGB Parade shows the red and green channels elevated in the highlights while the blue channel is suppressed, you have a confirmed yellow cast.

Step 2: Applying the Lumetri Color Effect
Navigate to your Effects panel, search for "Lumetri Color," and apply it to your clip. It is best practice to keep this as the final stage of your color correction node, or at least after your primary exposure corrections have been made.
Step 3: Navigating the Curves
Within the Lumetri panel, locate the Curves tab. While the RGB curves are useful for exposure, the Hue vs. Sat (Hue vs. Saturation) curve is our primary tool for this operation. This curve maps every color in your image along a horizontal spectrum; by manipulating the vertical axis, you can control the saturation of specific hues without affecting the hue itself or the luminance of the shot.
Technical Execution: Targeted Desaturation
The power of the Hue vs. Saturation curve lies in its ability to isolate color ranges. To remove a yellow tint, follow this specific sequence:
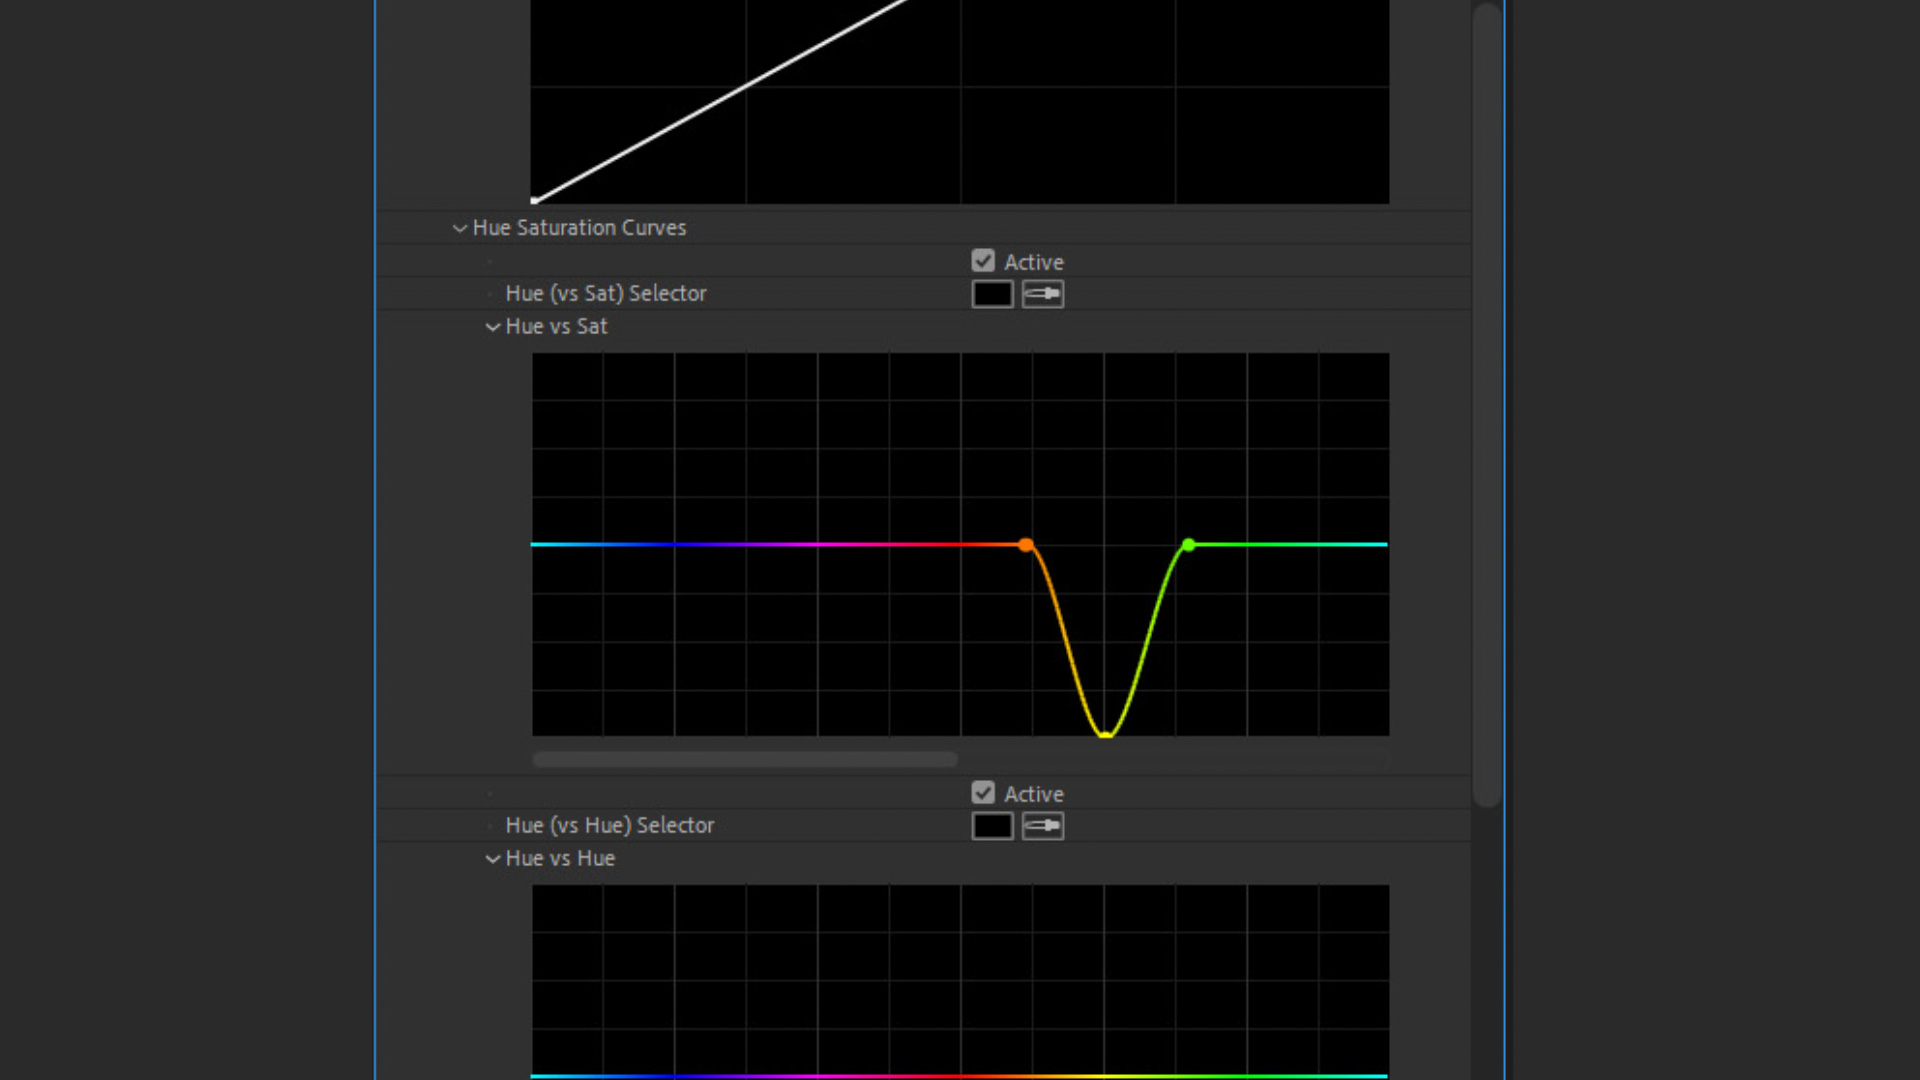
- Anchor the Range: You must create three anchor points on the Hue vs. Sat line. Place them on the Orange, Yellow, and Green markers. These anchors act as a "fence," ensuring that your adjustments are confined to the yellow-orange-green spectrum, leaving your blues, magentas, and reds untouched.
- Surgical Removal: Once the anchor points are set, select the center point (the yellow area) and drag it downward. As you drag the point toward the bottom of the graph, you are effectively telling the software to remove the saturation from that specific hue.
- Refinement: For shots with a heavy orange cast, you may need to shift the center point slightly to the left toward the orange spectrum. Monitor your Vectorscope while performing this move; you should see the color information pulling back toward the center (the neutral point) of the scope.
Supporting Data: Why Curves Outperform Basic Sliders
In a professional post-production environment, accuracy is measured by the ability to isolate variables. Basic color correction tools—like the "Temperature" and "Tint" sliders—are global adjustments. When you shift the Temperature slider to "cool" an image, you are applying a blanket blue tint across every pixel.
This leads to a phenomenon known as "color bleeding," where skin tones (which are essentially shades of orange) become sickly or washed out. By contrast, the Hue vs. Saturation method is a local adjustment. It specifically targets the yellow channel. Because the curve is anchored at the edges, the transition between affected colors and unaffected colors remains seamless. This allows for a much higher degree of control, ensuring that the whites become pure and neutral while the subject’s face retains its natural, healthy color.
Professional Perspectives and Industry Standards
Colorists often emphasize that there is no "one-size-fits-all" button in digital cinematography. According to industry colorists, the most common error in beginner editing is over-correcting.

"The goal of color grading," says a veteran post-production supervisor, "is not to make everything perfectly clinical. It is to make the image believable. If you remove too much yellow, you risk ‘deadening’ the image, making it look digital or plastic."
Industry experts suggest that after using the Hue vs. Saturation curve, editors should consider lowering the opacity of the Lumetri effect to roughly 80-90%. This allows for a "blended" correction that removes the offensive tint while keeping a touch of the original warmth, which often feels more natural to the human eye.
Implications for Your Workflow
Implementing this technique has significant implications for your overall editing efficiency:

- Time Management: By mastering these curves, you eliminate the need to perform complex secondary masking or power windows for minor color balance issues. This saves hours in the final grading pass.
- Creative Flexibility: This technique gives you the freedom to shoot in challenging lighting environments without the fear that your footage will be unusable. You can embrace "run and gun" shooting styles while maintaining high-end, clean production values.
- Consistency: When working with multi-cam setups or varied lighting, using the Hue vs. Saturation curve allows for rapid matching. You can copy the Lumetri effect from one clip to another, and because the curve is a specific color-range adjustment, it will often translate well across different shots taken in the same lighting conditions.
Beyond the Basics: Advanced Lumetri Techniques
Once you are comfortable with the Hue vs. Saturation curve, the Lumetri Color panel offers a vast ecosystem of tools to refine your image further. For those interested in deeper color manipulation, exploring LUTs (Look-Up Tables) is the next logical step.
LUTs allow you to apply complex, professional-grade color grades to your footage instantly. However, it is vital to remember the "Correction vs. Grade" rule: always correct your white balance and exposure issues (using the techniques described above) before applying a creative LUT. If you apply a LUT to footage that has an uncorrected yellow tint, the LUT will only amplify those errors, potentially causing color banding or clipping.
As you continue to refine your editing craft, remember that every tool in your arsenal, from the simplest slider to the most complex curve, exists to serve the story. A clean, balanced image ensures that the viewer’s attention remains where it belongs—on the content—rather than being distracted by a yellow tint that shouldn’t be there. Whether you are working on a high-budget commercial or a personal YouTube project, these professional habits will elevate your work to a higher standard of visual excellence.
